Showing posts with label Projects/crafts. Show all posts

Wednesday, January 15, 2014

Malachi Turns 1

Dear Malachi

It is so hard to believe that you are one today.  It is a bitter sweet feeling.  I love the little man you have and will become but sad to say good bye to the baby.   From the second you came into my life you made it better.

You are such a sweet, happy boy that lights up our lives.  The instant we look at you, you smile ear to ear and you are such a joy.  I had no idea that I would enjoy raising a boy so much, but I absolutely love it.

You are a stubborn boy, and you know what you want but you have such a sweet sensitive spirit.  That is amazing qualities to have and I pray that you will use those qualities to do mighty things to further the Kingdom of the Lord.

You mean the world to me and I absolutely love you.

Love

Your Mommy

My dear sweet baby turns 1 today.   I can not believe how fast time goes by!

You are a great eater and eats more than Niah does right now.  Your favorite food is MEAT.  You hava a well rounded diet and will try everything.  You are not completely satisfied until he gets breast milk (trying to figure out best way to break this habit).  You eat about 5 small meals a day.

You can say momma, dadda, hi/hey, thank you, that, and I have heard you say Niah a few times.  You babble a lot and will get into a mood and repeat lots of words.

You have no interest in walking, you only pull yourself to standing every once in awhile.  You gave of the army crawl on your birthday and now you crawl normal most of the time (in the last 24 hours).  We had to lower your bed last week for the first time since you were born because you were pulling yourself up.  You love music and will sing and bang on anything. 

Your favorite toy right now is the Little People setups with the slides.  You will play for 30-40 minutes with them.

You go to sleep at 7 and usually wake up at 7 eat and go back to sleep till 8- 8:30.  You usually go to sleep at night with no problems, just lay down and go right to sleep.  You take 2 naps, the first at 10 and sleep till noon, and then you wake up for an hour or so and go back down and sleep another hour.  You usually go right to sleep for your morning nap but will cry for your afternoon nap.  If you miss your afternoon nap you are ready for bed really by 6 but I try to get you to hold out till 6:30.


Yes I posted this a day late.


Tuesday, February 19, 2013

Tie Onsies

It is seriously impossible to find cute newborn boy clothes. I have found a few separate pieces that I match together and had to order a lot of items online. After searching through etsy.com for items I found adorable tie onsies. They were ridiculous expensive so I decided to make them. It was so easy.

Here is a brown tie I made... I will get photos of just the onsie so you can see it better


What you need
1. scrap material
2. onsies
3. iron on
4. sewing machine.

1. You draw a tie on card stock and mine was pretty small because I put them on newborn onsies. I did mine in two pieces the knot and the tie piece. This is your pattern

2. Cut out the material in the tie shape.

3. Cut out the iron on in the tie shape.

4. Follow your iron on directions and iron the tie on the onsie make sure it is centered.

5. Then I used an applique stitch and sewed around the tie to ensure it would stay on.

That's it!! You have an adorable onesie. I paired my little man's onsie with leg warmers.


linking up


Thursday, December 6, 2012

The Nursery

Our lives have slowed down just enough for me to start focusing on a nursery for this little one. With Niah, we had a snow storm and and got snowed in and I was able to do lots of preparation for her in that week.

Here is my inspiration picture for the nursery. It will not be the same but I am using the theme and colors and going from there.


Luckily, the room is already painted so I do not have to worry about that. I have the material for the bedding and started making the bedding this week, I am almost done with the bumper.

I searched and searched for the perfect rug at the perfect price. I found a wonderful cyber Monday deal and got the rug for $50 for a 5x8. I believe it was a pretty good deal considering it was originally $300 and every rug I found was $300 or more. It almost matches the picture exactly

Matthew likes this light fixture. It is a little out of our price range so I have been trying to find one close to that and redo it to look similar. I have found a few on amazon.

I currently am looking at ordering a giant giraffe stuffed animal to go in the room as a decor item. The one in the picture is a Doug and Melissa product and ran close to $60 and I found one similar to that one just shorter for $20 with S&H. I purchased panel curtains and now since I am not allowed to use a drill on the wall, I am waiting for the husband to hang my rod. My guess is this weekend it will be done.

In Niah's room we have a maternity picture with the scripture "The Lord called me before my birth; from within the womb he called me by name" so I am wanting to do something similar in this room. This poor baby is going to get Niah's changing table and crib. Eventually I will move the crib back in Niah's room because it turns into a daybed and a full size bed. I plan on having the baby sleep in a bassinet in our room for the first 4 months and then do the transition of Niah to a toddler bed. My mom found Niah a beautiful antique dresser that I was going to refinish but my husband wanted to strip the paint and since I could not be around the paint stripper he willingly took on the project.

It is coming along as I find the exact right items for the room, slowly but surely. I found some adorable safari animal statues I am going to put on a shelf for $3 a piece and thankfully they were a neutral. I love basic neutral colors (my entire house is covered in it)

I also got a starting supply of preemie and newborn clothes. I do not think this baby will be early but the dr. does not think the baby will be over 6lbs and I am praying for the sake of recovery and my body it is not over 6 lbs (he is pretty sure I could not naturally deliver a baby bigger than Niah, it was pretty risky with her). I was unprepared for Niah and did not have anything to fit her so I already took the plunge and got some preemie outfits.

Right now the room is in shreds but I am excited for the end result.

Photobucket

Tuesday, November 13, 2012

Weekend in Project - Winter fur Vest

This weekend I got out the sewing machine and I am keeping it out because I have alot of sewing to do before now and when Baby #2 arrives but over the weekend I made adorable little vest for my little girl.

All it took was

A pattern
not even a 1/2 yd of fur material
not even 1/2 yd of lining
1 button of choice
and around 4 inches of cording.

I tweaked a patter we already had. The pattern was for a shorter vest but I wanted a longer one so I added 2 1/2 inches to the pattern.

I went to town and made 2 for my little girl for her pictures thur. I am going to make 2 for niece as well.

I think they turned out nicely


Here is a pic of Niah wearing it in our photo session with Yesteryear Image


Tuesday, September 18, 2012

Update to a picture

My mom got me a picture on sale at Old Time Pottery. We have all tree pictures in our living room and it went with the pictures great but it had this terrible cheap frame. I had it up for at least 6 months and get tire of looking at the frame. One day at Menards, I bought some rustoleum spray paint and decided I was going to paint it.

This is a before picture:


1. I took all of the staples out that was holding the frame in place. Which was alot harder than it sounds and the staples flew across the room.

2. I painted the frame and let it dry.

3. Instead of stapling it back my husband used some kind of sealant and glued it back together.

4. There you go it looks so much better now in my living. The great thing is that the picture cost $10 and the paint cost $4 so total cost $14 for a picture that matches our house perfectly.

I have been really slow about adding details and decor to my house because I hate spending a ton of money on things I do not need and love when I can find great deals. So It may take me 10 years to get my whole house decorated but slowly I will will get there.

Here is an after picture


”Tip

Thursday, May 17, 2012

Tutu Party - Decor

I did some fairly easy diy decorating most of it just required time.

I did the High chair skirt and table skirt the same. It is similar to a no sew tutu which I also did.

Needed:
Ribbon
Tulle - colors of choice

1. I cut strips of tulle double the length I wanted it.

2. You fold the strips in half.

3. put the tulle around the ribbon and pull the ends through.

4. Continue until finished.

I tied the ribbon around the high chair and table. I also hot glued it in a few spots to ensure that it did not move.


Tutu Wands

Needed
Tulle
Ribbon
sticks - I used cake pop sticks


Cut tulle, I cut mine about 6 inches long. I used a total of 16-20 pieces. Put 4 pieces of tulle together you can do all the same color different colors. and tie a thin ribbon in the middle. Continue this 4 times if you use 16 or 5 if you use 20. Then tie all of the pieces of tulle together. Once tied together spread tulle pieces apart. I hot glued the balls to a stick and decorated the stick with ribbon.


I found the next 2 diy at Martha Stewart

Hanging Pom-Poms
1. Stack eight (I did 12, 8 was not thick enough) 20-by-30-inch sheets of tissue. Make 1 1/2-inchwide accordion folds, creasing with each fold.

2. Fold an 18-inch (I did not find it extremely important to be right at 18 inches for this) piece of floral wire in half, and Put on center of folded tissue; twist. With scissors, trim ends of tissue into rounded or pointy shapes.

3. Separate layers, pulling away from center one at a time.

4. Attach ribbon to wire for haning

5. I just used a sewing pin to hang in the ceiling, did not leave a hole


Napkin Rings
With just a few changes, these follow the same steps as the hanging pom-poms.

1. Stack four sheets (I did 6) of tissue. Cut a 10-by-5-inch rectangle, going through all layers. Make 3/8-inch-wide accordion folds.

2. Fold an 18-inch piece of floral wire in half, slip over center of tissue, and twist to secure. Trim ends of tissue.

3. Separate layers, pulling away from center one at a time.

4. Bend wire into a loop to fit around napkin, and twist end around loop to secure. I cut the left over wire because I did not use them as napkin holders just placed them on the plate.


Picture holders for Tables - I didn't want to spend anymore money but wanted to find a way to display her pictures in her tutu dress on the table

I took Medium binder clips. I clipped the picture at the bottom of the picture. Then took the metal clip on the side facing the picture off. sat in on the table.


Linking Up With
HookingupwithHoH


Friday, May 11, 2012

Tutu Party - Ruffled Cake

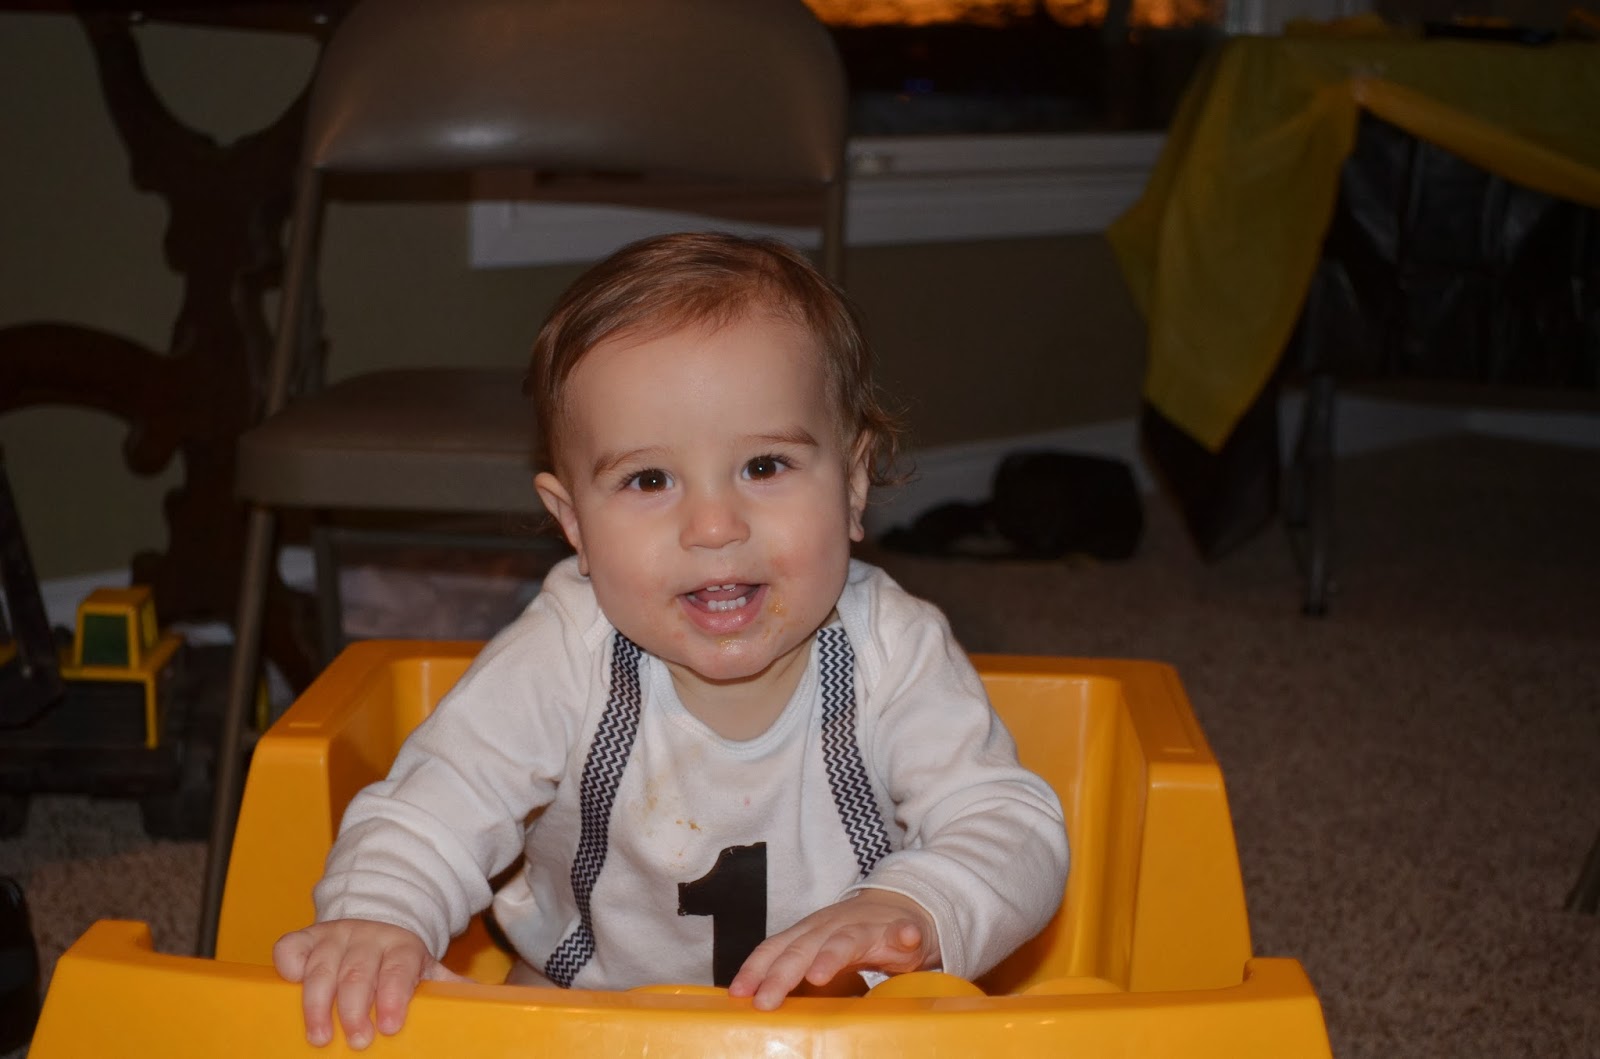
For Niah's Birthday, I made 2 cakes. 1 a smash cake for Niah and the second one was a cake for the guest. Both cakes were a sour cream white cake but the big cake had a raspberry filling in the cake. Niah's cake was a 6 inch cake and the other cake was a 3 layer 9 inch cake. I used the ruffled technique that can be found in the Victoria Magazine or Better Homes and Garden. When I first saw it, I thought there was no way I could make those cakes being I have very little experience with icing cakes. I did it a little in high school but since then have not touched an icing bag. I did a trial run on my mom's cake whose birthday was 4 days before Niah and loved the results so I did Niah's cake following the same techinque.
I will start with the cake recipe, this is an excellent recipe that is very moist.
Cake Recipe
1 box white cake mix (I used Duncan Hines)
1 cup all-purpose flour
1 cup granulated white sugar
3/4 teaspoon salt
1 1/3 cups water
2 Tablespoons vegetable or canola oil
1 teaspoon vanilla extract
1 cup sour cream
4 large egg whites

In a large bowl, whisk together cake mix, flour, sugar and salt. Add remaining ingredients and beat with hand mixer for 2 minutes, or until well blended
Preheat oven to 325 bake about 30 mins.

I made this recipe twice, the first time for 2 layers of the 3 layer cake and the second time I used the batter for the 6 inch cake and the last layer.

For the icing after several different icing recipes I went with a swiss meringue buttercream
Icing recipe:
5 large egg whites (30g each–total 150g)

1 cup plus 2 tablespoons superfine granulated sugar

1 pound (4 sticks) unsalted butter, softened, cut into cubes

2 teaspoons pure vanilla extract

Pinch of salt

Method:

Wipe the bowl of an electric mixer with paper towel and vinegar, to remove any trace of grease. Add egg whites and sugar, and simmer over a pot of water (not boiling), whisking constantly, until temperature reaches 140 degrees F, or if you don’t have a candy thermometer, until the sugar has completely dissolved and the egg whites are hot.

With whisk attachment of mixer, begin to whip until the mixture is thick, glossy, and cool. Switch over to paddle attachment and, while mixing on medium speed continously, add softened butter in chunks until incorporated, and mix until it has reached a silky smooth texture (if curdles, keep mixing and it will come back to smooth). Add vanilla and salt, mix well. You can also add a wide variety of flavourings, extracts, and more.

Keep in airtight container in refrigerator for up to one week, leaving out at room temperature when needed, rewhipping in mixer for 5 minutes.

I trippled this recipe to have enough for all of the cakes. I added purple icing food color to make it the purpe.

Raspberry Filling:
1 1/2 cups frozen raspberrys
1 tbsp cornstarch
2 tbsp lemon juice
1/4 cup sugar

In a small sauce pan, combined all of the ingredients and slowly bring to a boil over medium-high heat (keep stirring until thickened for best results). I actually used a little more sugar because the first go around was to tart so just an overflowing 1/4 cup. Let cool completely before using.

What you need to Decorate:
12 or 14 icing bag (I used 14)
Petal tip- (the bigger the petal tip the sloppier it was for me, I used Wilton 103)
Cake stand helpful but not required
Metal Icing spatula is helpful but not required

1.Assemble the cakes. If you are as new at this as me I will explain how I assemble the 3 layers. 1st you need completely flat layers so cut your cakes to make them flat on both sides (I just used a schraded knife, they have tool though). Then Ice the top of your first layer, then put raspberry filling, then put your second layer and ice the top raspberry filling and then place your last layer on top. I always ice the top of the cake last.

2.The next step is to ice the cake starting with the sides. Then do the top. To get a smooth top clean your utensil and go over the top to smooth it out.

3. Next is to the decorating. I found the best way to ice is for the cake to be on a stand. The first thing I did is make lines in my cake ro keep my ruffling straight. I had a tall kabob and measured about an inch an half and indented the icing with the kabob all the way around. To start you are actually going to hold the icing bag straight up and down. with the wide part towards the cake and the smaller part towards you. You will just go back and forth from bottom to top of cake, line to line (the lines you made to help things stay straight). It is better if you do not break from icing until you finish the row. After you finish the row you start the next row starting at the bottom.

4. Then you do around the edge of the top with the same techinque of back and for but going around the circle. I was going to write on the cake but did not master the writing so that will be next years cake.

1 thing that did happen to me is I had an air bubble in my icing bag and messed up a whole row so make sure you watch for air bubbles in the bag by squeezing the icing down as you use it.


For only doing this 1 other time, I was quite please how it turned out. I hope that you can try it and see it does not take an expert to do it.


Linking up with:
sshbutton
FTFBadge


Monday, May 7, 2012

Invitations to the big 1 year old Party

We just had Niah's 1st Birthday!! It was a tutu themed birthday and everything turned out just wonderful. Over the next couple of weeks I will blog about the party and all of the diy projects that I did for the party. Total cost of party $60, give or take some.

Today I am going to talk about the invitations. To match the party we had invitations in the shape of a dress with a tutu skirt glued on. See Below.

What you will need for these invites:

cardstock

tulle

small bead ribbon

Scissors

Hot glue gun

1. I had the invitation wording printed on one side, a picture of Niah on the other. I printed 2 invites on 1 piece of regular sized card stock.

2. I cut the 2 copies of the invite down the middle of the page

3. I took one invite as a sample and drew a dress outline on it and cut it out. Then I took the outline and put it on top of each invite and traced the dress on the invite. I cut out all of the dress outlines on the invitations.

4. I glued the small bead ribbon around the neck line with a hot glue gun.

5. For the tulle I cut out 2 strips of tulle a little longer than the invitation. I put hot glue on the bottom portion of the invite and scrunched the tulle up as I pushed it down on the glue. Then I would do the other side with the tulle.

To mail I got a little bit bigger envelope and I was worried how they would look after the endured the mail, but they turned out great.

Linking up with

Making Keeping It Simple
DIY projects and crafts Between Naps on the Porch
Pinworthy Projects @ Just us Four